

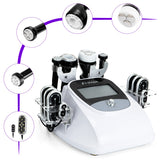


Why cavitation machine maintenance is an operational habit
The handpiece is the part of the system that meets the client. Its transducer face, seal and cable are exposed to gel, pressure, movement and repeated cleaning every session, so small lapses compound. The acoustic field produced by the device is the mechanism under study; histological research describes tissue-level effects from ultrasound-induced cavitation (Bani 2013 ultrasound cavitation histology; PMID: 25289235; DOI: 10.1097/GOX.0b013e3182a7f222). That is a mechanism observation, not a clinical outcome, and it is a reminder that the handpiece — not the gel or the casing — is the precision component worth protecting.
Maintenance also protects the conversation at the front desk. The FDA non-invasive body contouring guidance (fda.gov) states that these technologies do not treat obesity or produce weight loss, that improvement may be temporary and that multiple sessions are commonly needed. A well-maintained unit lets you deliver and document the session you booked instead of improvising around a weak handpiece. For the physics behind the session, see the ultrasonic cavitation overview. If you are still comparing units, the cavitation machine buying checklist covers warranty and service questions at purchase; this article assumes the machine is already in your room.
What actually determines handpiece life
There is no universal hour counter for a cavitation handpiece. This guide gives no service-life figure, power rating or replacement interval: those are model-specific and belong in the manual. You can control the conditions that stress the assembly.
- Contact and pressure. Let the transducer face glide over a wet layer. Pressing harder does not improve transmission and adds strain to the face and the operator's wrist.
- Cable handling. Most failures are mechanical, not acoustic. Avoid tight coils, chair traffic over the lead and yanking the connector; coil loosely and unplug by the grip.
- Heat and ventilation. A warm face can signal a drying coupling layer or a blocked vent. Check both before assuming the transducer failed.
- Residue left to dry. Gel left on the face or connector after a session hardens and can work into seams.
- Storage. Store it dry in its cradle, away from sun and heat, with the lead slack.
Frequency labels do not answer durability questions either. "30K", "40K" and "80K" are nominal working frequencies, not power ratings or quality tiers; the 30K vs 40K vs 80K frequency guide explains why a higher number changes wavelength and depth rather than establishing a better result. Check the manual's stated care requirements before treating one handpiece as interchangeable with another.
Coupling medium and gel discipline during a session
Ultrasound couples poorly through air. A continuous wet layer between face and skin lets energy enter tissue instead of reflecting at the surface, and gives a smooth glide that keeps contact pressure steady. Operationally: start with an even layer, keep it wet for the whole pass and reapply the moment the surface begins to drag or look matte. If the layer dries mid-pass, add gel rather than raising intensity. A thicker layer is not more effective — once the gap is filled, extra product mainly makes a mess on the client and the drape.
Keep a consistent gel protocol across staff, and wipe the transducer face after every session using only the manual's cleaning method. If the face feels warm, stop and check the coupling layer and contact before attributing it to the device. Ingredient and patch-testing questions belong in how cavitation gel works. The point here is narrower: the coupling layer protects the handpiece, not an active treatment step.
A cavitation machine maintenance checklist for daily and weekly care
Write the routine down and initial it. A checklist becomes a record when a fault appears or a warranty claim is reviewed. Adapt the intervals to your manual; the table is a structure, not a substitute.
| When | Check | Why it matters | Record |
|---|---|---|---|
| Before each client | Transducer face clean, intact, no dried residue | Residue breaks coupling and can scratch the face | Initials |
| Before each client | Lead and connector undamaged, plug seated | Prevents intermittent output and poor contact at the socket | Pass / fail |
| Before each client | Gel within reach and layer kept wet | Dry contact drives surface warmth and drag | Pass / fail |
| After each session | Face wiped with the manual-approved method | Stops residue hardening overnight | Initials |
| After each session | Handpiece returned to cradle, lead slack | Reduces cable strain and trip hazards | Pass / fail |
| Weekly | Vents and fan area clear of dust and hair | Blocked airflow raises internal temperature | Date |
| Weekly | Cables flex-tested by hand at the strain relief | Early cracks are found before a session fails | Date |
| Weekly | Spare handpiece and gel stock counted | Downtime is often a stockout, not a repair | Count |
| As needed | Service or replacement per the manufacturer's manual | Keeps warranty terms intact | Date and note |
Home users: the same logic applies — clean the face, keep the layer wet, untangle the lead. The home-use cavitation shortlist covers personal purchases; this article stays focused on a booked treatment room.
Troubleshooting handpiece faults before you call for service
Most "the machine is broken" reports are contact, coupling or connection problems. Work from the outside in and stop if the manual tells you to. Never open the handpiece or console: internal work belongs to the manufacturer or an authorised service partner, and opening it can void warranty terms.
| Symptom | First checks | If it persists |
|---|---|---|
| No output from one handpiece | Seat the connector; inspect the lead for a sharp bend; try the manual's stated test routine | Take it out of service and arrange evaluation |
| Output feels weaker than usual | Confirm wet coupling layer, full contact and correct mode; check whether another handpiece behaves the same | Book a service check rather than raising settings |
| Face or skin feels unusually warm | Reapply gel, keep the handpiece moving, confirm vents are clear | Stop the session and follow the manual's fault guidance |
| Intermittent cutting out | Check connector seating and strain-relief area; note whether position or movement triggers it | Replace the lead or handpiece per the manual |
| Error code on the console | Photograph the code and write down what you were doing | Quote the code to the manufacturer or service partner |
| Visible crack, fluid ingress or exposed wire | Isolate the unit from clients immediately | Remove from service; do not tape or improvise a repair |
Keep a log beside the machine: date, client slot, symptom, change and outcome. Patterns emerge — a handpiece that fails only when the lead bends a certain way is a cable problem.
Spare parts, compatibility and planned downtime
The cheapest downtime is the downtime you schedule. If one handpiece carries most of your booked hours, a compatible spare turns a cancelled afternoon into a two-minute swap. Match the part to your exact model and check the manual: a handpiece that physically fits is not automatically the right electrical match.
One commonly stocked spare is the 30K cavitation machine handpiece spare. Treat it as an availability example, not a universal recommendation — confirm compatibility with your manual and keep the same care routine for the spare. For a wider view of accessories and models, browse the full cavitation machine collection. If you run an S Shape unit, the S Shape machines buyer guide provides model context when matching an accessory family.
Regulatory context: the eCFR classification for a "focused ultrasound stimulator system for aesthetic use" (21 CFR 878.4590) covers focused, Class II systems intended for tissue heating or mechanical disruption of cell membranes (eCFR focused ultrasound classification; ecfr.gov). A portable, low-frequency, non-focused spa machine is not that category of device. Do not borrow medical-device service intervals or "medical-grade" claims from it; your manual is the deciding document.
FAQ
There is no universal figure. Life depends on the model, handling and cleaning. The manufacturer's manual is the only source for a stated service interval or replacement criterion; this article supplies no hour count.
Use only the method specified in your manual. Some surfaces and seals tolerate wipes better than others, and a harsh product can shorten the life of the face or seal.
No. Nominal frequency describes acoustic output, not build quality or lifespan. The frequency comparison guide earlier explains the distinction; durability is a manual-and-handling question.
Check the coupling layer, keep the handpiece moving and confirm vents are clear. If warmth persists, stop and follow the manual's fault guidance. Do not treat it as a reason to raise intensity.
If your booked hours depend on one handpiece, a compatible spare is cheaper than a cancelled clinic. Match the exact model, verify against the manual and keep the same cleaning routine.
A lighter version: clean the face, keep the layer wet, store the lead loosely. The principles do not change with the setting, only the session count.
Where to go next
- How ultrasonic cavitation works — the mechanism and evidence boundary behind the session.
- How to choose a cavitation machine — the purchase-stage checklist for warranty and service terms.


0 comments